Friday, May 29, 2009

More on taking photos

After talking up the important of taking lots of photos of your babies, I thought I'd share some tidbits I've learned.

Now, you need to know that I have a nice Nikon camera and I've shot photos professionally on occasion. Not Holland photos, but few Holland people have enough money to pay for photos. And, after I show you my portfolio, you'll know another reason I haven't shot Holland photos professionally.


I'm into truth-in-advertising. No pretending here. Take a look at some of the photos I've gotten in baby photo sessions:


Doesn't my arm have a nice roundness over the topline?
Maybe a little flat at the wrist....


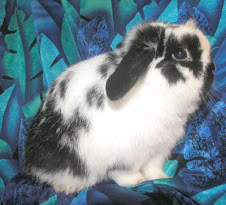
Yoohooo! The camera's this direction!


There is nothing behind that cloth but a wall.
Which apparently smells like alfalfa.


I think RR1 is really short for ARRRRRGGGGGHH!


Come to Mama.....

So why haven't I shot Holland photos professionally? I can't afford to pay somebody to let me.


Thursday, May 28, 2009

Taking photos

My friend Kay wisely takes photos of her babies as they are growing, so she can see how her lines change and develop on their way to maturity. It's a great idea and one I highly recommend.

Try to take photos at about 3 weeks, 6 weeks, 9 weeks, 12 weeks, and about 16 weeks. Be sure to carefully label your photos. With digital photography, it's relatively easy to take too many photos and lose track of which tort baby is in that photo you took a few months ago.

So label carefully. Put a name or tattoo number plus date of photo on each photo, even if you just save the photos on your computer's hard drive. I have a folder in My Documents for Rabbits, then for Photos. In that folder, each rabbit gets its own folder so the photos are easy to compare.

Holland breeders love to see photos of Hollands, so take lots and display them somehow, whether on paper or on a website or via e-mail. Tomorrow, I'll show you some of the things I've learned while taking Holland photos.

Tuesday, May 26, 2009

Nest box management


The way does prepare their nest boxes for an incoming litter makes me laugh at times. In the photo above is a nest box that's been worked over while the doe is waiting out the last few days before babies come. We put a layer of wood chips and a nice bed of grass hay in the box but most does, like the one above, have to do their own nest-building.

Some does are a nervous wreck until they get the box in their cage. Then they build a nest
immediately, burrowing into the hay and sometimes even pulling some fur. The burrow into the hay confirms that the doe is indeed bred. Sometimes they burrow in and then, a day later, tear it apart. You never know what pregnancy hormones do to the brain.

We had a doe once who, when the box was delivered to her cage, promptly tore the bedding to shreds. She threw out every bit of hay and wood chips. If we put more in, she tossed that, too. But the morning she was due, she pulled copious amounts of fur and then delivered immediately. See what I mean about hormones and brain activity?

So I don't pay much attention to the pre-birth nest. But the post-birth nest box interests me a lot. Here's the kind of nest I love to see when I check on the new mama and babies:

What I like to see is a nice fluffy pillow of fur with new babies nicely tucked in underneath. I've tried to duplicate that with newly-pulled fur but I can't do it. When a mama had healthy babies in the box and she's going to take good care of them, I see a nice fluffy nest.


Here's a nest after a doe lost her babies.

Instead of being light and fluffy, this nest is tromped down. Only rarely are there living babies in a nest like this, although I've sometimes found newborns alive in the fur. What usually happens is that the doe will, within 24 hours, build a nice fluffy nest like the first one pictured if there are living babies in the nest. If no babies survived, the nest is more like a shelled-out hollow of flat fur and grass.

Color projects

Once upon a time, I had some tri-colored Hollands. I was new to showing and thought for some reason I could figure out the color genetics overnight. Not. The tri's didn't show well and I didn't know what I was doing.

That ended the color projects until we got a broken black buck in the barn. Most of Mallo's (you can see his photo in the sidebar) offspring were black until it looked like we were going to have nothing but blacks. So we started a new color project: torts.

OK, that's a dumb joke because it wasn't long before we had a lot of torts in the barn. Along with lots of blacks.

But we decided to jump into black otters, because my genetic calculations hinted that good blacks would improve black otters. And we had some nice blacks (thanks, Mallo).

So our first Best in Show was a broken black otter junior doe. We've made some progress with the otters. But they are exclusively Timothy's project.

Now, I'm anxiously awaiting the hopeful birth of another color project as a broken tort doe, Kisses, is due soon with babies from a chestnut agouti buck, Grizzwald. I hope to get some chestnuts and add yet more color to our barn.

When tort is our color project of the year, we may not be all that adventurous... but it's a start!

Sunday, May 24, 2009

Evaluating new litters

In our area, as litters approach 5-6 weeks of age, they are eligible to go to pet markets. So we try to go through each litter at about 6 weeks.

Here's what we do (and record):
  • Weigh each baby
  • Tattoo each baby (although sometimes we don't tattoo obvious pets)
  • Check teeth for malocclusions and eyes for eyespots
  • Determine sex (although some seem to change back and forth for a while...)
  • Evaluate type: body structure, shape of head, crown, width and length of ears, etc.
  • Establish rank of each baby in the litter
  • Check feet. In Hollands, the proportion of the feet (width to length) in a baby gives good clues into the body type of the animal. Babies with wide, short feet will often have wide, short bodies and also wide heads.
  • Take photos of each baby to compare to later. Sometimes a nice 6-week-old baby will go through an ugly stage so it's nice to be able to look back at those baby photos to remember what we liked. Photos help us evaluate the stages of development.
Anything you'd add to this evaluation list?

Inner ear infection

Recently I noticed that a junior doe (about 3 months old) had one ear straight up in the air. Not that this is unusual in my barn, but she also seemed to have a slight tilt to her head. It was a "maybe...maybe not...." situation.

In treating wry neck, which I am thankful I rarely deal with, I've had great success dripping some Pen-G into the ear and massaging the antibiotic until it's absorbed. So that's what I did with this doe. Four day later, she was worse. So I switched to dripping LA-200 into the ear. That didn't work either, so I switched back to Pen-G. After two weeks of this, the doe looked miserable (her fur was pretty oily looking from the antibiotics) and maybe getting worse.

In a moment of crazy inspiration, I pulled a little bottle of tea tree oil out of my cupboard. That stuff is a natural antibiotic made from the Australian tea tree. When I Googled its use for inner ear infections, I found that it is mixed with olive oil and dropped into the ear of a child with an ear infection.

If it's safe for a child, it's safe for my bunny. Or so I reasoned.

It worked. Within a day, her head was more upright. I kept up the treatments for five days and she's fine. Her appetite is better and her head is fully straight. Even the ear has now come down.

I wasn't very exact on the proportions. I used about 2 tablespoons of olive oil and 5-8 drops of tea tree oil. Using a syringe to draw the oils, I then dribbled about .3 cc into each ear and massaged. Keep it in mind.

The magic of warm weather

Yesterday, I went to our bunny barn to check on Carousel, a Holland doe due in the morning. She'd already had one baby on the wire - dead and chewed on. I took it out, bummed that she hadn't delivered more.

Four hours later, I went out to do some breeding and found a baby on the floor four stackers away from her cage. It was still alive so I scooped it up and, on my way back to her cage, discovered another baby on the floor. It was alive, too, so I put both into the nest box. I had a 70-watt light bulb inside a reflector on above the box, so figured that was their best chance to get warmed up.

An hour later, as I pulled her tray out to empty it, I discovered yet another baby in the litter. It had been kept warm by the light bulb above so into the nest box it went. You'd think it was a skinny little peanut to get to through the floor wire, but it wasn't. Soon after, the doe fed the three babies and settled the fur into that beautiful fluffy pattern I love to see in a nest.

So, at this point, the doe who seemed to have blown a pregnancy is feeding three babies. Who'd figure?

Welcome!

Welcome to the Zao Hollands blog, where we'll put up bunny news, tips and opinions as they come to us. We raise Holland Lop rabbits on the plains of Northeast Colorado. My son, Timothy, and I work together on this project, although lately he's been whipping me at the shows.